
 |
by Larry Guyer, A la Carte Digital Studios
For the last couple of years, I have photographed a number of special edition Hot Wheels® cars for semiannual collector shows. The cars average 2-1/2” long and would be enlarged to 48” wide banners…a magnification of 16 times life size.
Whenever the next job came in I always had mixed feelings…excited about the challenge, but fearing the technical obstacles in creating an image at this level of enlargement. They look so “cute” when holding them in your hand, but can look very terrifying when viewing the 150 MB file at 100% size on the monitor.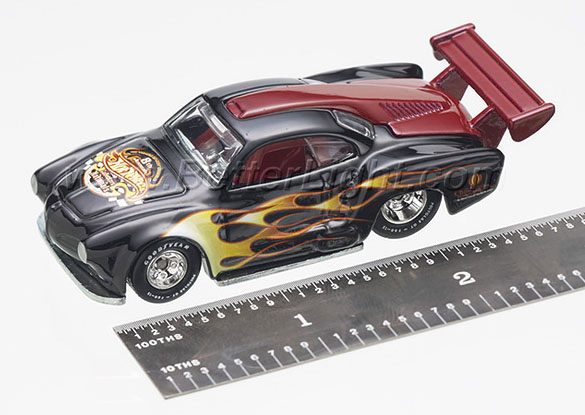
I remember when the client first called me and asked me to photograph several Hot Wheels cars for his convention; I thought, “how hard could that be!” — six cars, same size, same angle, same setup…a couple of hours…no problem!
Once I had the first car under the camera I quickly realized that I was in for a challenge. I was just not thinking about the shallow depth of field, focus issues, and other problems related to creating a digital file of the tiny car that would be printed to over 48 inches wide.
The cars have multiple planes to attempt to keep in focus: Tire-to-tire; far-front headlight to rear driver’s side tail light; the vertical side of the car; edge-to-edge on the hood and trunk; plus the top of the roof which had a small decal commemorating the convention.
The designer had notified me that the banner printer wanted a file that was at least 150 ppi for a 48” wide banner; that meant the digital capture needed to be over 100 MB. A single-shot digital back could not provide a file size anywhere near this size and so I decided that the cars should be photographed with a 4x5 view camera and my Better Light digital scanning back.
Even though the view camera has a shallower depth-of-field than a medium format camera, I had the benefit of swings and tilts to help control the focus. I also realized that I could not overcrowd the 4x5 frame, since that would only further decrease my depth-of-focus. I chose a 210mm focal length lens and kept the image of the car under 50% of the size of the format. This smaller image size made it necessary to use the Better Light Super8K (380 megapixel) scanning back to capture an 8-bit RGB image of about 150 MB, just enough for the specs of the banner printer.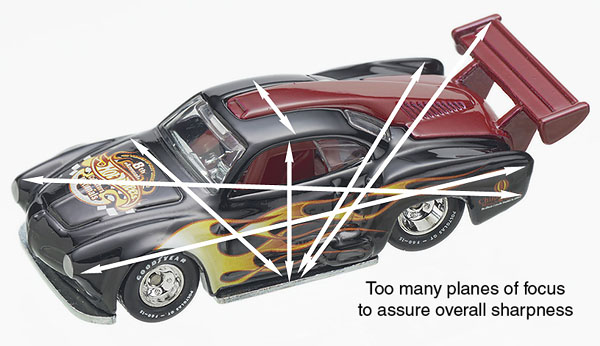
The first few sessions of these cars were a series of compromises. I chose the 210mm lens which would minimize distortion and keep the camera a reasonable distance from the car, and not have too long of a bellows, which would only make the exposures longer. I found a comfortable image size for the car to get as much depth of focus that I could, but still achieve the desired image resolution.
When you are working with large digital files, you have to remember that you are viewing the image at 72 to 96 pixels per inch; so the car was equal to a print about 8 feet wide on the monitor --- that’s way too close to be looking at these miniature model cars! As I would check prescans or lower res test images, I could see that it was going to be nearly impossible to gain focus everywhere…so I had more compromises to make.
The setup for the first car would normally take about 1-1/2 to 2 hours to match the previous camera and car angle, set the lighting, and struggle with the best combination of swings and tilts of the camera to get “adequate” focus. Every car (or truck) was a little different in size and had different characteristics that would totally invalidate the focus. Each car would take another 30 – 45 minutes to find a suitable focus compromise.
Last fall, one of my business associates told me about Helicon Focus, and it sounded like it was worth a try. With my first attempt to photograph the Hot Wheels cars with the help of Helicon Focus, I continued to use my swings and tilts corrections, and then created several additional focus positions for the Helicon Focus processing. I was a little disappointed because I had only made 3 to 4 images, and my altered focus plane caused some errors since I was not careful enough about my far-front and far-rear focus positions. More image captures to process would certainly have been an improvement.
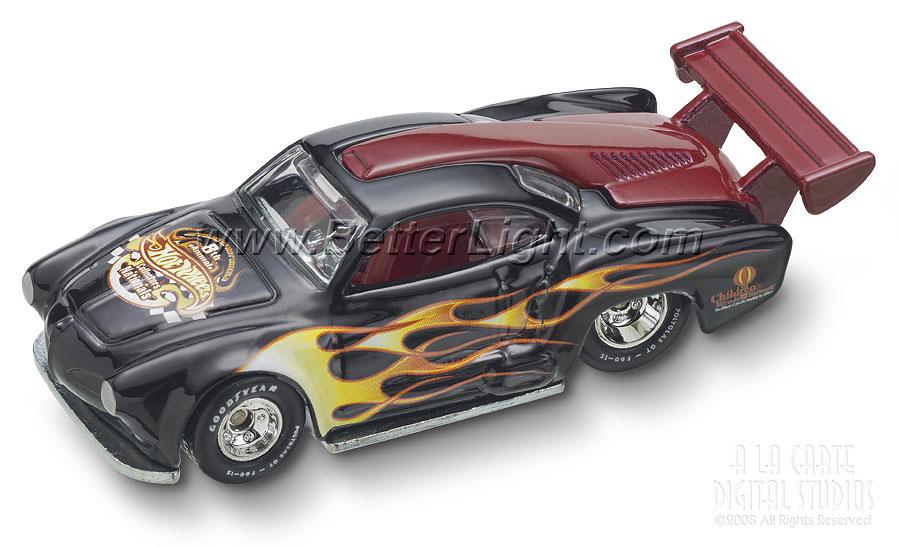
On the most recent session, I only used a lens “swing” to maintain sharp tire-to-tire focus; then I marked positions on the camera’s focus knob to capture a series of six exposures with adequate depth-of-field to get sharp focus on all critical points of the model car. To create the final image of one car over 100 MB, it required nearly 1 GB of image files to process…yet a small price to pay for the improved results.
The results were so much better than what I was able to do in one capture. At first I was very skeptical that the small decal (about ¼ - ½ inch square) could never be rendered sharp and clear…I was amazed, it was magical that a half dozen “mostly out-of-focus images could be assembled as one sharp, clear, perfectly aligned image. I’m a believer!
Although I did not actually clock my time spent focusing for a single exposure in the original assignments, it seemed that the total of 20 minutes of exposure time with the scanning back was an acceptable trade-off. Also, I found that my stress level was dramatically reduced since I wasn’t continually being disappointed by my scanning tests, thinking that I had “nailed” the focus.
Helicon Focus has proved to be a necessary tool in this type of commercial assignment. What sounded like a simple product photo was actually a complex macro photo, with all of the added focus and depth-of-field obstacles. Helicon Focus is now one more tool to help me create the “perfect image”.
Additional Information on Helicon Focus — Extended Focus Imaging with the Scanning Back
|
© 2008 Copyright Larry Guyer and Better Light, Inc. All Rights Reseved by Author.
|
||