|
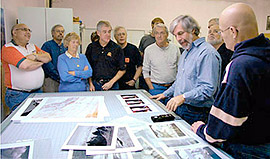
BETTER LIGHT'S 8th "Almost Annual" OWNERS CONFERENCE
June 4th – 5th, 2009 Location: Better Light Offices & Studios, San Carlos, California |
||||||||||||||||||||||||||||||
|
2009 Speakers Tips & Techniques A unique attribute of our Better Light owners group is their willingness to share…our email users’ forum is an active and informative resource and each year a number of owners step forward to share their photographic accomplishments with our Conference audience. Below are some specific tips and other useful information extracted from our speakers presentations this year. Take advantage of these summaries and follow the links for downloadable presentations and more details on the topics.
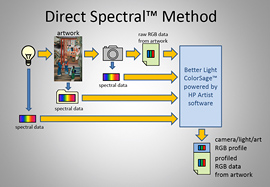
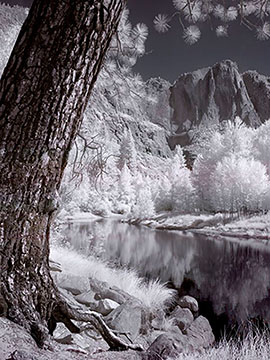
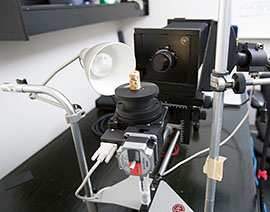
TIP #1 As the keynote speaker, Mike reviewed the new ColorSage™ application for direct spectral workflow that will improve accuracy in reproducing artwork and other critical subjects. When using standard ICC camera profiling, there are still many variables that can introduce color errors. ColorSage uses the spectral data of the artwork itself, plus the spectral characteristics of the camera sensor and lighting to perfect color reproduction. This process greatly improves color accuracy, removes subjective color-correction judgments, and incorporates a brightness-balancing function to correct for uneven lighting. It will take a little more time and effort in the capture stage, but could save hours in post-capture production to get proofs and prints to your client. More information on ColorSage is available on the Better Light website. TIP #2 Randy has provided his Soft Proofing slide presentation online as a summary and review of his program. Making the “perfect print” relies on many factors — most of them determined by your own quality (Delta E) tolerances and those of your customer. Viewing conditions, the selection of equipment and software, your monitor calibration and soft proofing setup will all be influenced by the level of quality you expect to achieve. The slide series provides a step-by-step procedure to optimize your monitor setup for accurate soft proofing and other tips to improve your work. Click this link for additional product information, contacts, and references related to Randy’s presentations. TIP #3 Everyone is doing panoramic images now with all sizes of cameras and with the help of numerous stitching software programs. Our scanning technology is still a superior image capture method producing pure RGB pixel data compared to the Bayer pattern sensor’s interpolation of color. In addition it is important to keep in mind how important the resolution of the capture is to image quality…regardless of the size of the reproduction. Panoscan has posted an example of the failure of low resolution (72 ppi) scanning for a web image, compared to over sampling at double the resolution and reducing to 72 ppi in Photoshop. http://www.panoscan.com/Resolution.html Two images are presented on the web page at exactly the same size with the same JPEG compression. The low-resolution image shows several ugly artifacts caused by scanning at low resolution. The subject detail can cause a moiré pattern or ugly rainbow colors in certain patterns and the low-res image can have an overall "jaggy" look to it. The over sampled image shows none of these problems when presented on the web page at exactly the same resolution. The higher resolution image is noticeably cleaner because it was OVER SAMPLED at double the finished resolution for the internet. It is also helpful to over sample on any client project, regardless of the output needs. Finer detail will be captured, gradations will be smoother, a larger image is better for retouching and enhancements, and you never know when the client will want a bigger file than originally specified. The extensive over sampling capability of the Better Light and Panoscan systems deliver razor sharp images where other lower resolution digital cameras will look "jaggy". Most photographs can be dramatically improved by simply selecting a higher resolution setting. TIP #4 The sensors in Better Light scanning backs are extremely sensitive to infrared light so two removable Infrared-Absorbing filters are provided with the camera. The “Daylight” filter is used outside and with low-infrared emitting light sources such as fluorescent lamps. The thicker “Tungsten” filter absorbs ten times more infrared and is recommended for high-infrared emitting lights such as HMI and tungsten fixtures. Removing this IR filter opens up new possibilities of imaging, capturing a mix of visible and infrared light. By adding an Infrared-Transmitting filter such as the Hoya R-72 (720 nanometer cutoff), that Tim uses, his unique images are only from infrared light in the scene. Infrared-Transmitting filters absorb most of the visible light spectrum and transmit only the infrared region. Typical IR effects include: Blue sky becomes very dark to black; reflections in water become black; most fabrics photograph white or very light gray; people have milky white skin; and green leaves and foliage become white. IR photography also cuts through haze, making distant objects seem closer and sharper. There are a number of different filters by several manufacturers that vary in the region of the spectrum that is transmitted or blocked, and how rapidly the cut off occurs. Explore the possibilities! It is important to add that the point of focus changes with an infrared filter over the lens. It is necessary to focus with the infrared filter in place...which can be very difficult, if not impossible, by eye. Using the Digital Focus Tool in the ViewFinder software makes precise focusing very easy. TIP #5 Planning and preparation is very important in landscape photography. Tim offers a few suggestions:
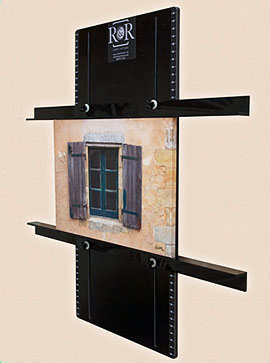
The most critical of all of these suggestions is to carry at least 1.5 to 2 liters of water. Dehydration, with as little as a 3% loss of water, can cause confusion and disorientation, plus you are more prone to making poor decisions. You could get hurt or take some lousy pictures. TIP #6 Just about every object or manuscript photographed at the West Semitic Research Project (WSRP) requires a special technique, but the key to all of these techniques is light. Some texts are incised in stone so a light source is used to create shadows in the shape of the letters to increase readability. Many documents are written on parchment or papyrus, so a soft, diffuse light that will create no shadows at all is preferred. Some writing is so tiny a "light brush" is best to direct a very narrow beam of light to a small area. Other writing cannot be seen at all because the background is so dark that it looks like ink. In that case infrared techniques make the ink stand out while the background "drops out." Ken Zuckerman says “We have a whole "bag of tricks" out of which we can take whatever technique is best for a particular object”. In the attached PDF file, a few selected slides from their conference presentation will show some of the tools that are used to capture these rare artifacts. Cylinder Seals are small objects carved from stone or shell, about the size of a AAA battery, up to a size D battery. They were used much like a signet ring in the Middle Ages, or a credit card today, in that they were rolled across clay tablets to verify a person’s participation in an economic transaction. In other words, they were the ancient equivalent of a signed charge card. The WSRP team has developed a way to photograph cylinder seals and other cylindrical objects as 360-degree rollouts—panoramic photographs in reverse. Pictured to the right is an example of a cylinder seal “rollout” using the Better Light Pano/WideView™ Adapter and the built-in tools of the ViewFinder™ software. Additional examples from this presentation can be downloaded as a PDF file (3 MB). For more information on The West Semitic Research Project photography work, visit http://www.usc.edu/dept/LAS/wsrp/information/. TIP #7 “You have got to have a dream, some goal of what you want to do with your life and your skills”, Randy encouraged the group at our evening session. He revealed part of his personal dream is to “…mentor students to help them reach their dreams through photography and art.” Randy accomplishes this through his Institute of Visual Arts Maui www.ivamaui.com. Go to the site and sign up for the eNewsletter to keep informed of the educational opportunities. Throughout the year, Randy and his wife Rebecca host professional photographers from all over the world during classes taught by some of the best instructors in the country. If you want to learn…what better place to go to class than the Hawaiian paradise of Maui. Randy also demonstrated a new product of interest to anyone doing flat art copy work. R&R Copy Systems (www.randrcopysystems.com) has released a new design of their wall-mounted art support unit. The Copy Wall can turn difficult copy procedures into a simple task, quickly hanging all types of art in a safe and secure way, flat and centered to the lens. Several sizes are available.
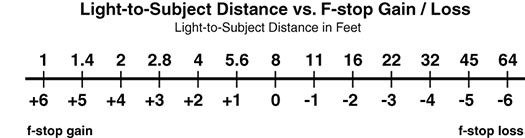
TIP #8 The camera f-stop is our primary quantitative descriptor…it is a dimensionless number that is a primary factor in our exposure and a means to interact with other exposure variables. Fortunately, most of these variables all relate to “The Rule of 2X” where the values are Double or Half of the previous setting. This makes it quite easy to make changes in exposure and still optimize the quality of the scan. In photography, “f-stops” are also a unit used to quantify ratios of light or exposure, with “one stop” meaning a factor of two or one-half. Line Time (speed or duration of exposure) and ISO (sensitivity or amplification of sensor) are easy to calculate with any number value change that is double or half. Light intensity is a bit more complex since intensity varies by wattage and distance from the subject. Related to intensity of the light, doubling or halving the brightness also equals a one f-stop change. This can be accomplished with higher wattage lamps, changing the number of lighting units, and modifying the reflectors, filters and diffusers used. The distance of the light to the subject is a significant factor that is often overlooked for its impact on the exposure. The distance will also have an effect on the coverage of the light, therefore forcing a compromise in the selection of the best overall position. The variation in brightness based on distance is controlled by the Inverse Square Law which states that if you double the distance you have only ¼ of the amount of light and must open the lens two f-stops to maintain the same exposure. This formula can be simplified to some degree by relating the distances to f-stops on a ruler scale. Consider the ruler to be written in f-stop numbers…16” = f-16, 8” = f-8 and so on. If you measure the distance where the light is now placed and then measure the new distance, you can calculate the number of f-stops of light that you have gained or lost. For example: Our light is 4 feet from the subject, but is not giving us enough coverage so we must move it back farther. The light is then moved back to 8 feet. Compare those distances to f-stops, f-4 is where we started and we moved to f-8…that is 2 f-stops moving from f-4 to f-5.6 and then to f-8. This also follows for the Inverse Square Law, we doubled the distance, so we had to open 2 f-stops.
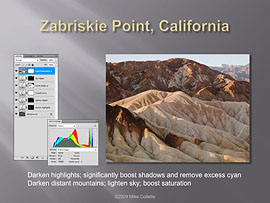
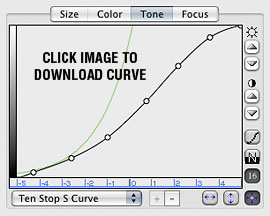
If we go the other direction, and move the lights closer, we GAIN two f-stops when we move from 8 feet to 4 feet. A smaller change from 8 feet to 6 feet (1/4 of the distance) will gain one f-stop in brightness. This can make a big difference when you are running out of ISO range or the scan time is too long…look for opportunities to move your lights in a little closer to make a noticeable improvement in available brightness. If you are not satisfied with the coverage and evenness of the light when you move closer you can use Robin Myers' Equalight™ program to correct for any lens and light falloff. TIP #9 Unlike situations when we are copying artwork and attempting to achieve a perfect reproduction of the original under controlled lighting, landscape and architectural photographers, among others, have the additional obstacle of using natural lighting in the environment. The challenge is to get the output image to represent the photographer’s vision of the scene even in situations with a wide dynamic range involving direct sunlight. The scanning back can record a dynamic range over 11 f-stops under ideal conditions, but the dynamic range of the scene will have to be “interpreted” in order to have the same impact in the print. Digital capture has provided tools to achieve these goals more easily than in the days of film. The histogram data values, and preview image help us establish an ideal exposure. Characteristics of the subject and lighting can be controlled with non-linear image compression at capture and in post-processing we have precise control of contrast and color aided by selective masking with pixel-level accuracy…and the greatest benefit of all, “Undo”. Mike’s recommendations to optimize image capture in wide brightness range conditions are: 1) Push the exposure as high as possible without clipping; 2) Consider time/noise tradeoffs when setting exposure; 3) Use a gentle S-shaped Tone curve to translate data values. To maximize image tone compression, Mike has created a new Ten-stop “S” Curve for use with the ViewFinder software. This curve smoothly translates ten f-stops of scene brightness into the full range of available data values and will produce a more useful distribution of 16-bit data values for post-capture processing. (Download the Ten-stop “S” Curve for ViewFinder). The primary intent of this curve is the preservation and optimization of maximum image information (data values). The wide dynamic range tone curve will lower image contrast and color saturation so the image is not ready for viewing at this point. Post-capture processing will recover contrast selectively while optimizing overall contrast and restoring color saturation to translate the scene as intended. The full slide presentation with post-production steps and example images can be downloaded and viewed as a PDF file. TIP #10 Steve Johnson has a lot to offer to any photographer, and even more to Better Light owners because of his extensive experience with the scanning back. It’s difficult to isolate any specific subject, so we thought best to provide a means to share more of what he has to offer through his latest book Stephen Johnson on Digital Photography and his on-going workshop series. There is something for everyone in this beautiful and definitive guide for digital photography enthusiasts, from cutting edge camera and software techniques to engaging discourse on the history and future of digital photography. For more information on the book refer to Steve’s website. Steve hosts unique multi-day photography field workshops that vary in length and location and immerse you in landscape photography and digital technology. Studio workshops include hands-on experiences in Fine Art Digital Printing, From Raw to Print and Color Management in his fully equipped digital photography lab in Pacifica, California. All workshops are limited in size to maximize individual attention. More information on the workshops at http://www.sjphoto.com/workshops.html. TIP #11 Although few in the audience have ever photographed food, many have probably considered it one of the best jobs to have (and it is)…but Steve made it quite clear that it is a lot harder than it looks. The food must “be perfect”, the props just right, lighting to set the mood and enhance the subject, and make everything fit the layout and delight the client. The right equipment, great food and prop stylists, and lots, and lots, and lots of practice can build your expertise as a food photographer. It takes time to understand and control the unique challenges of food. Food is not photogenic…and can be very uncooperative. This is a specialization that does indeed have “tricks of the trade”. Lighting is a very critical element in food photography since it is often necessary to reinforce a certain style or mood while enhancing the texture and moistness of the foods. Careful plate positioning, adding water and oil to add sheen, using mirrors and reflectors to create highlights and fill shadows, all contribute to a successful food photograph. The urgency of the advertising business encouraged Steve to invest in the Better Light scanning back, which was a logical choice to continue using his familiar 4x5 view camera and maintain the camera movements that are so important in food photography. The rewards were immediate – clients could get images right after the shoot with quality that exceeds transparency film. Having the previews on the computer screen helped fine tune positioning to fit complex layouts and make improvements to lighting and exposure faster than ever before. Quality, creativity, and customer satisfaction improved…there was no turning back.
Copyright 2007-09 Better Light, Inc. All Rights Reserved.
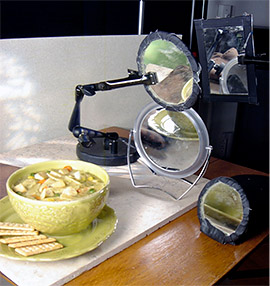
|
|
|||||||||||||||||||||||||||||